import base64
import xmlrpclib
import sys
def main():
global server
if len(sys.argv)==1:
print 'Usage: acttoken serveraddr [port] [ssl]'
print '\tdefault port = 8080'
sys.exit(1)
addr = 'localhost'
if len(sys.argv)>1:
addr = sys.argv[1]
port = '8080'
if len(sys.argv)>2:
port = sys.argv[2]
proto='http://'
if len(sys.argv)>3:
if sys.argv[3]=='ssl':
proto='https://'
serverurl = proto + addr + ':' + port + '/das/xmlrpc'
print serverurl
server=xmlrpclib.Server(serverurl)
result = server.das.listStockTokens({'status':'INACTIVE'})
if result[0]!='OK':
print "Error:", result
sys.exit(2)
tokens = result[1]
for t in tokens:
print t, server.das.enableToken(t, True)
if __name__ == '__main__':
main()
Friday, 6 August 2010
Activate Token - script practice on Deepnet Authentication Server (< 5.0)
This is a piece of code for activating all inactive tokens in token stock.
Send Token - script practice on Deepnet Authentication Server (< 5.0)
If you are using Deepnet two factor authentication server, probably you will agree with me that you can do almost everything with its management console. However, sometimes you may wonder if they provide script to do the trivial and repeatable job. Yes, they do, you can use python script to instruct the authentication server.
Here it is an example of sending token.
Here it is an example of sending token.
import base64
import xmlrpclib
import sys


def main():
 global server
 addr = '192.168.222.149'
 port = '8080'
 proto='http://'

 serverurl = proto + addr + ':' + port + '/das/xmlrpc'
 print serverurl
 server=xmlrpclib.Server(serverurl)
 r = server.das.sendToken('77004280', False, 'SMTP')
##Use 'SMS' to send token by SMS
 print r
 return

if __name__ == '__main__':
 main()
Monday, 2 August 2010
icon dimensions (0 x 0) don't meet the size requirements
I tried to upload the binary of my updated iphone app, and found Apple forced us to use Application Loader instead of the original iTunesConnect.
With the new approach, I got the following error
iPhone/iPod Touch: Icon.png: icon dimensions (0 x 0) don't meet the size requirements. The icon file must be 57x57 pixels, in .png format
I double-checked the image file, the size IS 57x57. I was puzzled, as it had no problem before(with iTunesConnect).
Luckily, I found the following link on Internet
http://www.iphonedevsdk.com/forum/iphone-sdk-development/54784-icon-dimensions-0-x-0-dont-meet-size-requirements.html
where tonymy suggested
Edit Project Settings -> Build -> uncheck Compress PNG Files

As you can imagine, this glitch is not hard to avoid. I always try not to make a fetish of Apple's products, as I believe nobody is perfect.
Next time, Apple should submit their applications to get our approval before publishing, just as our apps have to wait to be approved.
Sunday, 1 August 2010
xcode build error
I haven't touched iphone development for one year. Today I have to update my app which has some problem on iphone OS 4.x, however I got a mystery when I rebuilt the project after renewing the iphone development certificate.
Command /bin/sh failed with exit code 1
Justis Publishing Ltd:no such identity Line Location Tool:0

I have to admit that I did try this code sign certificate(Justis Publishing Ltd) last year before I opened an account with Apple (costed $99), and this cert was expired, so I deleted it in Keychain.
I am quite sure I chose the correct development certificate which was downloaded from my account on iphone development portal. In XCode IDE, I poked around every corner, but failed to get rid of this error.
My gut feeling told me this problem lied in the project setting, so I decided to have a look with the Terminal.
First of all, I went to the project setting folder(the ".xcodeproj" actually is a folder).
grep -i "Justis" *.*
The above grep command result said the string "Justis" did exist in the file project.pbxproj!
With nano, I saw the following in this file
/* Begin PBXShellScriptBuildPhase section */
3F3B364F0FD01DF6001754F2 /* ShellScript */ = {
isa = PBXShellScriptBuildPhase;
buildActionMask = 2147483647;
files = (
);
inputPaths = (
);
outputPaths = (
);
runOnlyForDeploymentPostprocessing = 0;
shellPath = /bin/sh;
shellScript = "if [ \"${PLATFORM_NAME}\" == \"iphoneos\" ]; then\nplatform=/Developer/Platforms/iPhoneOS.platform\nallocate=${platform}/Developer/usr/bin/codesign_allocate\nexport CODESIGN_ALLOCATE=${allocate}\ncodesign -fs \"Justis Publishing Ltd\" \"${BUILT_PRODUCTS_DIR}/${WRAPPER_NAME}\"\nfi\n";
};
/* End PBXShellScriptBuildPhase section */
I have no idea how and when I added this section to this project, but I think I don't need this section at all, so I deleted it and saved the file, then reopened Xcode, and rebuilt my project, Bingo! I got everything right!
Like all other IDE, Xcode is not omnipotent. Sometime, you have to look into Makefile(here the project.pbxproj file), isn't it?
Wednesday, 23 June 2010
MobileID Android Version
Deepnet Security hasn’t published the official document for how to use one of their products, MobileID Android version. Probably they assume you have an android phone and are familiar with the android OS, thus you can figure it out by yourself. Actually yes, as you will see, it is quite straightforward to use this app.
Download
The app can be downloaded with your phone’s browser at this link. Surely you can use other ways to install this app to your mobile phone.
Once installed, it looks like,
“Not token yet”, you can’t do anything! Don’t panic. If you think about it from a common sense perspective, you will try the “menu” button which each android phone is supposed to have.

Press it, you can see 4 menu items on the screen.
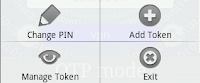 Add Token
Touch it to bring you another activity.
You can install a token with two different approaches. With the approach “By Download”, you need to input Service URL, Token Serial Number and Activation Code, get them from your deepnet service provider(DSP).
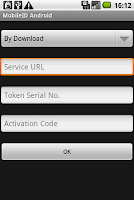
If your service provider doesn’t expose the service URL, then try the other approach “Install Locally”. This time you have to get Token Seed, Token Serial Number from your DSP, however you can name the “Token Name” of your own will.
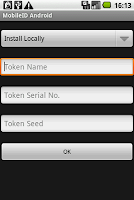
Once your click “OK” button, a new token will be added to your MobileID store, assume you have entered the correct data.
Now, touch the button “Generate OTP”, the OTP(s) will be generated and shown on the LCD area.
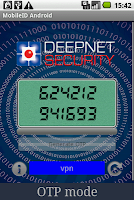
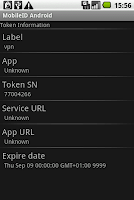
There are two buttons along with the bar which shows the current token’s name. The left one is an info button which shows the token information once you click it.
The right one is a sync button, it will synchronize the current token with Deepnet Authentication Server on the condition that this token is installed by download(it has a service URL).
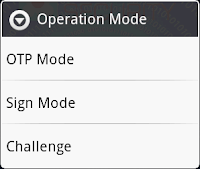
Do you notice a task bar at the bottom of the screen which shows the text “OTP Mode”? Hold it more than one second, a context menu will be shown, you can alter the mode among the three, OTP, Sign and Challenge.
Are you a VIP? Do you have many tokens to access different applications? If yes, you may ask such a question, how to easily switch the active token? Well, this app provides you a convenient feature: fling/swipe the area of current token, it will shift to the adjacent one based on your fling direction.
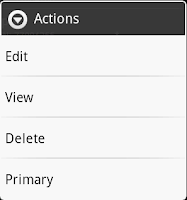
Management Token
This activity lists all the tokens you have installed. Select a token by long click, it will pop up a context menu which allows you to delete a token, change the token name, view the token details and make the selected token as the primary(active) one(stated with the sign *).

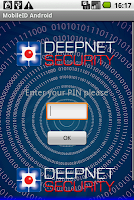
Change PIN
Want more privacy? You can add a PIN to protect this app. There is no OK or Cancel button on this activity, you have to click the “Back” button to go back the main activity.
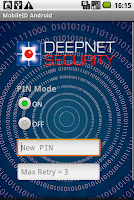
Now if you rerun the app(exit first), it presents the PIN page first, you have to enter the correct PIN so that you can access the normal OTP activity. Try with a wrong PIN, the app will show you a warning dialog saying how many times you can still try. If it reaches zero, sorry, the app will remove all tokens for security reason.
Exit
No statistic about how much battery power this app will consume during the idle. If you are concerned about this issue, press the menu item “Exit” for a fully quit to ease your mind.
It is said that all android phone with OS 1.5 or later can benefit from this app.
Friday, 18 June 2010
DualShield Radius Server Installation on Linux
A console installation of DualShield Radius Server is quite similar to the installation of DualShield.
Specify the installation path, here we use /opt/dualradius, you can use other folder, but be sure not the folder we have used to install the DualShield Server.

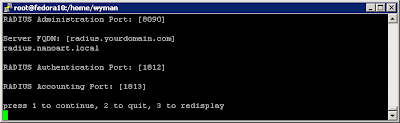
Set the administration, authentication, accounting ports, and radius server FQDN
This step produces some agent data which you need to pass it to the DualShield administrator.

The administrator uses the agent data to register a RADIUS server agent.

After registration, he can download the agent configuration file(*.dsc) and pass it back to you.

This step asks you where the agent configuration file is, so make sure you have copied the file to the server where DualRadius is being installed and given the correct path.

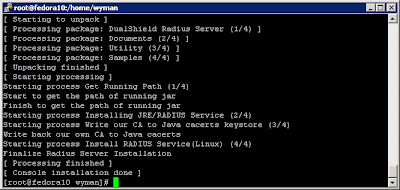
Now, the installer will do the real jobs – copy files and configure services etc. If you see the following output, then congratulations! You have installed DualRadius successfully.
If you still doubt, then try to list the processes by
ps aux | grep jsvc
You should see the similar ones like the following
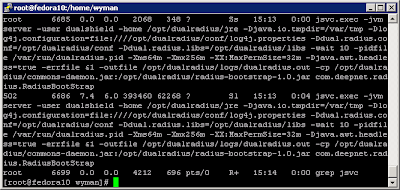
Sometime you may need to reinstall this product, I strong recommend you should remove the existing one first. You can find the shell script “removedualradius.sh” in the sub folder “tools”, check the details for what it tries to do.

Specify the installation path, here we use /opt/dualradius, you can use other folder, but be sure not the folder we have used to install the DualShield Server.

Set the administration, authentication, accounting ports, and radius server FQDN

This step produces some agent data which you need to pass it to the DualShield administrator.
The administrator uses the agent data to register a RADIUS server agent.
After registration, he can download the agent configuration file(*.dsc) and pass it back to you.
This step asks you where the agent configuration file is, so make sure you have copied the file to the server where DualRadius is being installed and given the correct path.
Now, the installer will do the real jobs – copy files and configure services etc. If you see the following output, then congratulations! You have installed DualRadius successfully.

If you still doubt, then try to list the processes by
ps aux | grep jsvc
You should see the similar ones like the following

Sometime you may need to reinstall this product, I strong recommend you should remove the existing one first. You can find the shell script “removedualradius.sh” in the sub folder “tools”, check the details for what it tries to do.
Dualshield Installation on Linux System
Deepnet Security Ltd officially provides the installation guides. If you decide to install DualShield by GUI with X Window, please look at them. The user experience is almost identical.
Here I am going to tell you how to install DualShiled by console installation, which is quite common in linux, as some linux servers(especially appliances) don’t install X11.
The linux installation package is supposed to work on the popular Linux distributions. We have tested it on Fedora 10, Ubuntu 9.04, Ubuntu JEOS, CentOS 5.2.
After downloading the package onto your linux system, the first thing you need to do is to change the file attribute to make it executable,
chmod a+x setupdualshield.bin
chmod a+x setupdualradius.bin

The installer needs to be run under the root privileges. On some system you can use sudo command, here I just use root account.
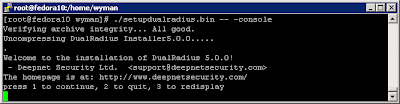
Look at the full command, it is
./setupdualshield.bin -- -console
If you only type ./setupdualshield.bin (without any arguments), it will be run as GUI mode installation

First it shows a simple welcome text, then asks you to “press 1 to accept, 2 to reject, 3 to redisplay”.
Next, it will show you the license agreement. Fancy about the terms and conditions? read them carefully, otherwise, just press a couple of enter keys to reach the end.
The default installation destination is “/usr/local/dualshield” , if you are happy with the default setting, just press enter. I usually install the software to /opt/dualshield folder.
Now you are going to define the settings for management server. The most important one in this step is the FQDN.

This step is to give some information for SSO server. Along with the management server FQDN, the SSO server FQDN will be used later in HOSTS file or on DNS server. Without them, your browser on LAN won’t know where to access them.

Check the official document for the meanings and purposes of these ports defined in this step. Leave them alone and just take the default ones if you decide to learn them later.

You’d better adjust the JVM switches based on the free memory of your machine to optimize the system performance.

Currently, the beta version only supports software encryption.

Install a copy of MySQL. Alternatively, you can connect to an existing SQL server. Here you basically need to specify server address, port, also a database for storing the DualShield data. Apart from MySQL, it is believed that Dualshield at least support Microsoft SQL server, Oracle.

That is all. After that, the installer no longer accept any user input, it will copy files and configure the services etc according to your previous settings.
You should see the following output if everything goes well.

Double check if the installation is successful with the command
ps aux | grep mysqld
Under normal circumstances, you would expect the following result

Also the jsvc processes
ps aux | grep jsvc

Don’t forget to modify the firewall(if iptables service is running) to allow the tcp ports for management console and SSO server, they are 8443 and 9443 assume you choose the default settings. For testing purpose or you are lazy like me, just stop the iptables service.

Now you can access the DualShield Management Console by typing the following URL in your browser
https://dualshield.nanoart.local:8443
Assume you are using the same FQDN and port as mine
Mind you, don’t use IP in this URL, also make sure your machine on where your browser is running can resolve the FQDN correctly. Based on your own taste, you can add it into your HOSTS file or DNS server.
At this stage, I strong recommend you to read the official “Quick Start Guide” for further information.
Finally, you might want to remove this product from your machine, then check the details of the shell script file “removedualshield.sh” provided in the sub folder “tools”.
Here I am going to tell you how to install DualShiled by console installation, which is quite common in linux, as some linux servers(especially appliances) don’t install X11.
The linux installation package is supposed to work on the popular Linux distributions. We have tested it on Fedora 10, Ubuntu 9.04, Ubuntu JEOS, CentOS 5.2.
After downloading the package onto your linux system, the first thing you need to do is to change the file attribute to make it executable,
chmod a+x setupdualshield.bin
chmod a+x setupdualradius.bin

The installer needs to be run under the root privileges. On some system you can use sudo command, here I just use root account.
Look at the full command, it is
./setupdualshield.bin -- -console
If you only type ./setupdualshield.bin (without any arguments), it will be run as GUI mode installation

First it shows a simple welcome text, then asks you to “press 1 to accept, 2 to reject, 3 to redisplay”.
Next, it will show you the license agreement. Fancy about the terms and conditions? read them carefully, otherwise, just press a couple of enter keys to reach the end.
The default installation destination is “/usr/local/dualshield” , if you are happy with the default setting, just press enter. I usually install the software to /opt/dualshield folder.
Now you are going to define the settings for management server. The most important one in this step is the FQDN.

This step is to give some information for SSO server. Along with the management server FQDN, the SSO server FQDN will be used later in HOSTS file or on DNS server. Without them, your browser on LAN won’t know where to access them.

Check the official document for the meanings and purposes of these ports defined in this step. Leave them alone and just take the default ones if you decide to learn them later.

You’d better adjust the JVM switches based on the free memory of your machine to optimize the system performance.

Currently, the beta version only supports software encryption.

Install a copy of MySQL. Alternatively, you can connect to an existing SQL server. Here you basically need to specify server address, port, also a database for storing the DualShield data. Apart from MySQL, it is believed that Dualshield at least support Microsoft SQL server, Oracle.

That is all. After that, the installer no longer accept any user input, it will copy files and configure the services etc according to your previous settings.
You should see the following output if everything goes well.

Double check if the installation is successful with the command
ps aux | grep mysqld
Under normal circumstances, you would expect the following result

Also the jsvc processes
ps aux | grep jsvc

Don’t forget to modify the firewall(if iptables service is running) to allow the tcp ports for management console and SSO server, they are 8443 and 9443 assume you choose the default settings. For testing purpose or you are lazy like me, just stop the iptables service.

Now you can access the DualShield Management Console by typing the following URL in your browser
https://dualshield.nanoart.local:8443
Assume you are using the same FQDN and port as mine
Mind you, don’t use IP in this URL, also make sure your machine on where your browser is running can resolve the FQDN correctly. Based on your own taste, you can add it into your HOSTS file or DNS server.
At this stage, I strong recommend you to read the official “Quick Start Guide” for further information.
Finally, you might want to remove this product from your machine, then check the details of the shell script file “removedualshield.sh” provided in the sub folder “tools”.
Subscribe to:
Posts (Atom)