Wednesday, 23 June 2010

MobileID Android Version

Deepnet Security hasn’t published the official document for how to use one of their products, MobileID Android version. Probably they assume you have an android phone and are familiar with the android OS, thus you can figure it out by yourself. Actually yes, as you will see, it is quite straightforward to use this app.

Download

The app can be downloaded with your phone’s browser at this link. Surely you can use other ways to install this app to your mobile phone.
Once installed, it looks like,


“Not token yet”, you can’t do anything! Don’t panic. If you think about it from a common sense perspective, you will try the “menu” button which each android phone is supposed to have.


Press it, you can see 4 menu items on the screen.
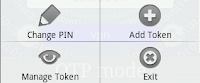
Add Token

Touch it to bring you another activity.
You can install a token with two different approaches. With the approach “By Download”, you need to input Service URL, Token Serial Number and Activation Code, get them from your deepnet service provider(DSP).
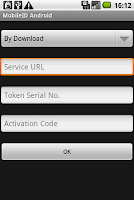


If your service provider doesn’t expose the service URL, then try the other approach “Install Locally”. This time you have to get Token Seed, Token Serial Number from your DSP, however you can name the “Token Name” of your own will.
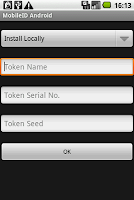


Once your click “OK” button, a new token will be added to your MobileID store, assume you have entered the correct data.

Now, touch the button “Generate OTP”, the OTP(s) will be generated and shown on the LCD area.
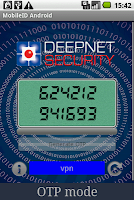


There are two buttons along with the bar which shows the current token’s name. The left one is an info button which shows the token information once you click it.

The right one is a sync button, it will synchronize the current token with Deepnet Authentication Server on the condition that this token is installed by download(it has a service URL).


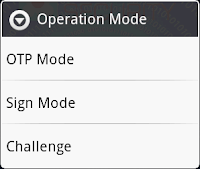
Do you notice a task bar at the bottom of the screen which shows the text “OTP Mode”? Hold it more than one second, a context menu will be shown, you can alter the mode among the three, OTP, Sign and Challenge.


Are you a VIP? Do you have many tokens to access different applications? If yes, you may ask such a question, how to easily switch the active token? Well, this app provides you a convenient feature: fling/swipe the area of current token, it will shift to the adjacent one based on your fling direction.

Management Token

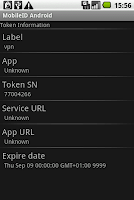
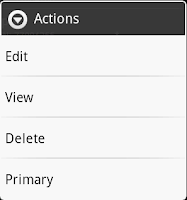
This activity lists all the tokens you have installed. Select a token by long click, it will pop up a context menu which allows you to delete a token, change the token name, view the token details and make the selected token as the primary(active) one(stated with the sign *).



Change PIN

Want more privacy? You can add a PIN to protect this app. There is no OK or Cancel button on this activity, you have to click the “Back” button to go back the main activity.
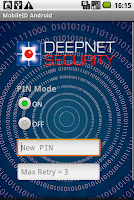


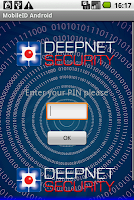
Now if you rerun the app(exit first), it presents the PIN page first, you have to enter the correct PIN so that you can access the normal OTP activity. Try with a wrong PIN, the app will show you a warning dialog saying how many times you can still try. If it reaches zero, sorry, the app will remove all tokens for security reason.


Exit

No statistic about how much battery power this app will consume during the idle. If you are concerned about this issue, press the menu item “Exit” for a fully quit to ease your mind.

It is said that all android phone with OS 1.5 or later can benefit from this app.

Friday, 18 June 2010

DualShield Radius Server Installation on Linux

A console installation of DualShield Radius Server is quite similar to the installation of DualShield.


Specify the installation path, here we use /opt/dualradius, you can use other folder, but be sure not the folder we have used to install the DualShield Server.


Set the administration, authentication, accounting ports, and radius server FQDN


This step produces some agent data which you need to pass it to the DualShield administrator.


The administrator uses the agent data to register a RADIUS server agent.


After registration, he can download the agent configuration file(*.dsc) and pass it back to you.


This step asks you where the agent configuration file is, so make sure you have copied the file to the server where DualRadius is being installed and given the correct path.


Now, the installer will do the real jobs – copy files and configure services etc. If you see the following output, then congratulations! You have installed DualRadius successfully.


If you still doubt, then try to list the processes by

ps aux | grep jsvc

You should see the similar ones like the following


Sometime you may need to reinstall this product, I strong recommend you should remove the existing one first. You can find the shell script “removedualradius.sh” in the sub folder “tools”, check the details for what it tries to do.

Dualshield Installation on Linux System

Deepnet Security Ltd officially provides the installation guides. If you decide to install DualShield by GUI with X Window, please look at them. The user experience is almost identical.

Here I am going to tell you how to install DualShiled by console installation, which is quite common in linux, as some linux servers(especially appliances) don’t install X11.

The linux installation package is supposed to work on the popular Linux distributions. We have tested it on Fedora 10, Ubuntu 9.04, Ubuntu JEOS, CentOS 5.2.

After downloading the package onto your linux system, the first thing you need to do is to change the file attribute to make it executable,

chmod a+x setupdualshield.bin
chmod a+x setupdualradius.bin


The installer needs to be run under the root privileges. On some system you can use sudo command, here I just use root account.

Look at the full command, it is
./setupdualshield.bin -- -console
If you only type ./setupdualshield.bin (without any arguments), it will be run as GUI mode installation


First it shows a simple welcome text, then asks you to “press 1 to accept, 2 to reject, 3 to redisplay”.

Next, it will show you the license agreement. Fancy about the terms and conditions? read them carefully, otherwise, just press a couple of enter keys to reach the end.

The default installation destination is “/usr/local/dualshield” , if you are happy with the default setting, just press enter. I usually install the software to /opt/dualshield folder.
Now you are going to define the settings for management server. The most important one in this step is the FQDN.


This step is to give some information for SSO server. Along with the management server FQDN, the SSO server FQDN will be used later in HOSTS file or on DNS server. Without them, your browser on LAN won’t know where to access them.


Check the official document for the meanings and purposes of these ports defined in this step. Leave them alone and just take the default ones if you decide to learn them later.


You’d better adjust the JVM switches based on the free memory of your machine to optimize the system performance.


Currently, the beta version only supports software encryption.


Install a copy of MySQL. Alternatively, you can connect to an existing SQL server. Here you basically need to specify server address, port, also a database for storing the DualShield data. Apart from MySQL, it is believed that Dualshield at least support Microsoft SQL server, Oracle.


That is all. After that, the installer no longer accept any user input, it will copy files and configure the services etc according to your previous settings.
You should see the following output if everything goes well.


Double check if the installation is successful with the command

ps aux | grep mysqld

Under normal circumstances, you would expect the following result


Also the jsvc processes

ps aux | grep jsvc


Don’t forget to modify the firewall(if iptables service is running) to allow the tcp ports for management console and SSO server, they are 8443 and 9443 assume you choose the default settings. For testing purpose or you are lazy like me, just stop the iptables service.


Now you can access the DualShield Management Console by typing the following URL in your browser

https://dualshield.nanoart.local:8443

Assume you are using the same FQDN and port as mine

Mind you, don’t use IP in this URL, also make sure your machine on where your browser is running can resolve the FQDN correctly. Based on your own taste, you can add it into your HOSTS file or DNS server.

At this stage, I strong recommend you to read the official “Quick Start Guide” for further information.

Finally, you might want to remove this product from your machine, then check the details of the shell script file “removedualshield.sh” provided in the sub folder “tools”.

Friday, 26 June 2009

Update Hackintosh (OSX86) from 10.5.6 to 10.5.7

You must have Mac OS 10.5.7 to install/update iPhone SDK 3.0. The current version on my Dell Inspiron 1525 Notebook was 10.5.6. As you know, it's Hackintosh, which cost me a few day to make it fully work.

To be honest with you, I had no courage to upgrade it. However, someone reported that one of my applications was not compatible with his iPhone OS 3.0.

After backing up my projects, I decided to take a risk.

There were a few discussions about this issue on Internet. My instinct told me that the steps described on the web page http://www.ihackintosh.com/2009/05/update-hackintosh-osx86-from-1056-to-1057/ were feasible.

I chose the old manual one though.

. First of all, I downloaded Delta Update, dsmos.kext, and osx86tools.

. Open a Terminal,
. Copy dsmos.kext to /System/Library/Extensions (sudo cp -R dsmos.kext /System/Library/Extensions),
. ”sudo –s”, then *type password*
. ”while sleep 1;”
. ”do rm –rf /System/Library/Extensions/AppleIntelCPUPowerManagement.kext;done”

. Leave the terminal window alone,

. Open 10.5.7 Update Installer.

. Run update wizard until the last page asking "Restart", but do NOT click the button.
. Go back to your terminal and press Control C to end the script.

. In terminal type: (yon can use other editor like vi)

”nano /System/InstallAtStartup/scripts/1”

Fortunately, in this file, I didn't see anything like "Steal", so it saved me doing the replacement(replace the line Dont Steal Mac OS X.kext with dsmos.kext)

. Exit your editor (nano or vi), but do NOT close terminal window!

Everything went smoothly until I tried to run osx86tools. osx86tools couldn't run at all! Other gui applications either! Luckily I knew(certainly after using Goolge to do a little bit search) that the there jobs (repair permissions, set extension permissions and clear extensions cache) could be done by command line. Please see the link http://pcwizcomputer.com/osx86tools/index.php?option=com_content&task=view&id=13&Itemid=28 for the details.

So I went back Terminal Window,

. "diskutil repairPermissions /" (Repair Permissions. Be patient, it took 5 minutes to finish on my machine)
. "chown -R root:wheel /System/Library/Extensions" (Set Permissions for Extensions Folder)
. "chmod -R 755 /System/Library/Extensions"

. "rm -rf /System/Library/Extensions.mkext" (Clear Extensions Cache, no worry you see it again after you remove it, as it will be re-generated)
. "rm -rf /System/Library/Extensions.kextcache" (didn't see it on my machine)


. Click the "Restart" button on the Update page.

Well, it's time to cross fingers!

It terrified me when the first reboot stopped at showing the Apple Icon and rebooted again. However the second reboot brought every thing to normal - I could logon, and the OS version was updated to 10.5.7!

Next, I tried to update iPhone SDK 3.0, without any problem!

This was my lucky day, but I was not happy. It was also my sad day, the day the world lost the "King of Pop", Michael Jackson.

Saturday, 20 June 2009

Google Chinese Pinyin IME on Android phone

Like me, you are probably looking for Chinese Input Method for your g1 phone which has a pure English OS. Android Market has a product (from it4startup), but it is not free. so I have no chance to try it, not sure how good it is.

Actually, Android has its official Google Chinese Pinyin IME. If you are a fun of Android, you can download the source code and build it yourself, or you can simply download it from

http://www.2shared.com/file/6381131/1b885d75/PinyinIME.html

I used Android SDK command abd to install PinyinIME.apk to my device. Probably you can install it by visiting the link above by your g1 phone.

After installation, the Locale & text page looks like as following


By default, you can switch between Chinese and English by pressing Shift-Space.


Sunday, 14 June 2009

XMLRPC on iPhone

My first iPhone application needed to call XMLRPC. Google search brought me to the site http://iphone.wordpress.org/development/. I tried its source code(the XML-RPC Client Framework was written by Eric Czarny), unfortunately it was not very promising in my case. At least I found a bug on its Base64 decoding, it hasn't been fixed yet when I tried to post this blog.

The bug appears at (note the difference of italic parts)
http://iphone.trac.wordpress.org/browser/trunk/Classes/XMLRPC/XMLRPCExtensions.m

+ (NSData *)base64DataFromString: (NSString *)string
52 {
53 unsigned long ixtext, lentext;
54 unsigned char ch, inbuf[3], outbuf[4];

It should be

+ (NSData *)base64DataFromString: (NSString *)string
52 {
53 unsigned long ixtext, lentext;
54 unsigned char ch, inbuf[4], outbuf[3];


I believe the author Eric Czarny must have an updated version. As matter of fact, it is hosted at http://github.com/eczarny/xmlrpc/tree/master. This new version is brilliant, it is very easy to integrate it into your own application. The link above also described how to invoke the XMLRPC request.
As supplement, I'd like to share my code with those people who,just like me, have little Obj-C knowledge and try to do iPhone development.

In your view controller header file(.h),

#import "eczarny-xmlrpc/XMLRPCResponse.h"
#import "eczarny-xmlrpc/XMLRPCRequest.h"
#import "eczarny-xmlrpc/XMLRPCConnection.h"
#import "eczarny-xmlrpc/XMLRPCConnectionManager.h"
#import "eczarny-xmlrpc/XMLRPCConnectionDelegate.h"

@interface ConfigViewController : UIViewController<XMLRPCConnectionDelegate> {

@end


In your view controller implementation file(.m),

Within some event handler, call

{

NSString strURL = @"http://x.x.x.x/xmlrpcserver";

XMLRPCRequest *request = [[XMLRPCRequest alloc] initWithURL:[NSURL URLWithString:strURL]];
XMLRPCConnectionManager *manager = [XMLRPCConnectionManager sharedManager];

[request setMethod:@"downloadBookDesc" withParameters:[NSArray arrayWithObjects:strUsername,PasswordHashCode,strISBN,nil]];

[manager spawnConnectionWithXMLRPCRequest:request delegate:self];

[request release];

}

You process the response in the following delegation functions,


- (void) request: (XMLRPCRequest *) request didReceiveResponse: (XMLRPCResponse *) response {

if([response isFault]) {
NSLog(@"Fault code: %@", [response faultCode]);
NSLog(@"Fault string: %@", [response faultString]);
NSString* strErrorMessage = [NSString stringWithFormat:@"%@%@", @"Error:", [response faultString]];
}
else
{
NSLog(@"Pased response: %@", [response object]);
NSArray *result = [response object];
// int counts = [result count];
NSData *str = [result objectAtIndex:1]; //index 0 = "OK"
NSLog(@"return = %@", str);
}

NSLog(@"response body: %@", [response body]);

}


- (void)request: (XMLRPCRequest *)request didFailWithError: (NSError *)error
{

NSEnumerator *enumerator = [[error userInfo] keyEnumerator];
id key;

NSString *strtest;
while ((key = [enumerator nextObject])) {
strtest = key;
}

enumerator = [[error userInfo] objectEnumerator];
id value;

while ((value = [enumerator nextObject])) {
strtest = value;
}

}

- (void)request: (XMLRPCRequest *)request didReceiveAuthenticationChallenge: (NSURLAuthenticationChallenge *)challenge
{
}

- (void)request: (XMLRPCRequest *)request didCancelAuthenticationChallenge: (NSURLAuthenticationChallenge *)challenge
{
}

Wednesday, 3 June 2009

VirtualChannelInitEvent parameter meaning

If you are trying MSDN sample TSSysInf, you may get crash. The problem happens at

strcpy_s(gszClientName, strlen((LPSTR)pData)+1, (LPSTR)pData);


On MSDN, it describes the event CHANNEL_EVENT_CONNECTED as "A connection has been established with a terminal server that supports virtual channels. The pData parameter is a pointer to a null-terminated string with the name of the server.".

However, it was a different story when I debugged it.

dataLength = 256;

pData value is as following,

0x00BCFB7C d6 ad 96 15 c7 72 be 65 e2 d3 32 d1 23 69 c7 87 Ö­–.Çr.eâÓ2Ñ#iÇ.
0x00BCFB8C 0b 6a 41 3e b3 83 b4 b4 0c 24 ab 6d 00 00 00 00 .jA>.ƒ´´.$«m....
0x00BCFB9C 00 00 00 00 88 fc bc 00 30 fc bc 00 28 00 00 00 ....ˆü..0ü..(...
0x00BCFBAC 00 00 00 00 1c fc bc 00 68 22 67 6a 30 fc bc 00 .....ü..h"gj0ü..
0x00BCFBBC 90 fc bc 00 40 00 00 00 10 93 96 00 e4 92 96 00 .ü..@....“–.ä’–.
0x00BCFBCC 96 22 67 6a 80 00 00 00 00 00 00 00 00 00 00 00 –"gj€...........
0x00BCFBDC 00 00 00 00 00 00 00 00 00 00 00 00 00 00 00 00 ................
0x00BCFBEC 00 00 00 00 00 00 00 00 00 00 00 00 49 21 67 6a ............I!gj
0x00BCFBFC 38 fc bc 00 48 fc bc 00 10 93 96 00 e4 92 96 00 8ü..Hü...“–.ä’–.
0x00BCFC0C 04 93 96 00 00 00 00 00 a0 fc bc 00 95 65 00 00 .“–..... ü...e..
0x00BCFC1C a0 fc bc 00 17 fe 66 6a 30 fc bc 00 20 93 96 00  ü...þfj0ü.. “–.
0x00BCFC2C 28 fe 66 6a 00 04 00 00 00 00 00 00 32 e4 9f 4c (þfj........2äŸL
0x00BCFC3C 8e 8e d8 58 f3 c0 07 c0 4a ad 8a 20 00 00 00 00 ŽŽØXóÀ.ÀJ­Š ....
0x00BCFC4C 00 00 00 00 00 00 00 00 00 00 00 00 00 00 00 00 ................
0x00BCFC5C 00 00 00 00 00 00 00 00 00 00 00 00 00 00 00 00 ................
0x00BCFC6C 00 00 00 00 00 00 00 00 00 00 00 00 00 00 00 00 ................

MS should have updated their document on this function VirtualChannelInitEvent.